Drawing Tools
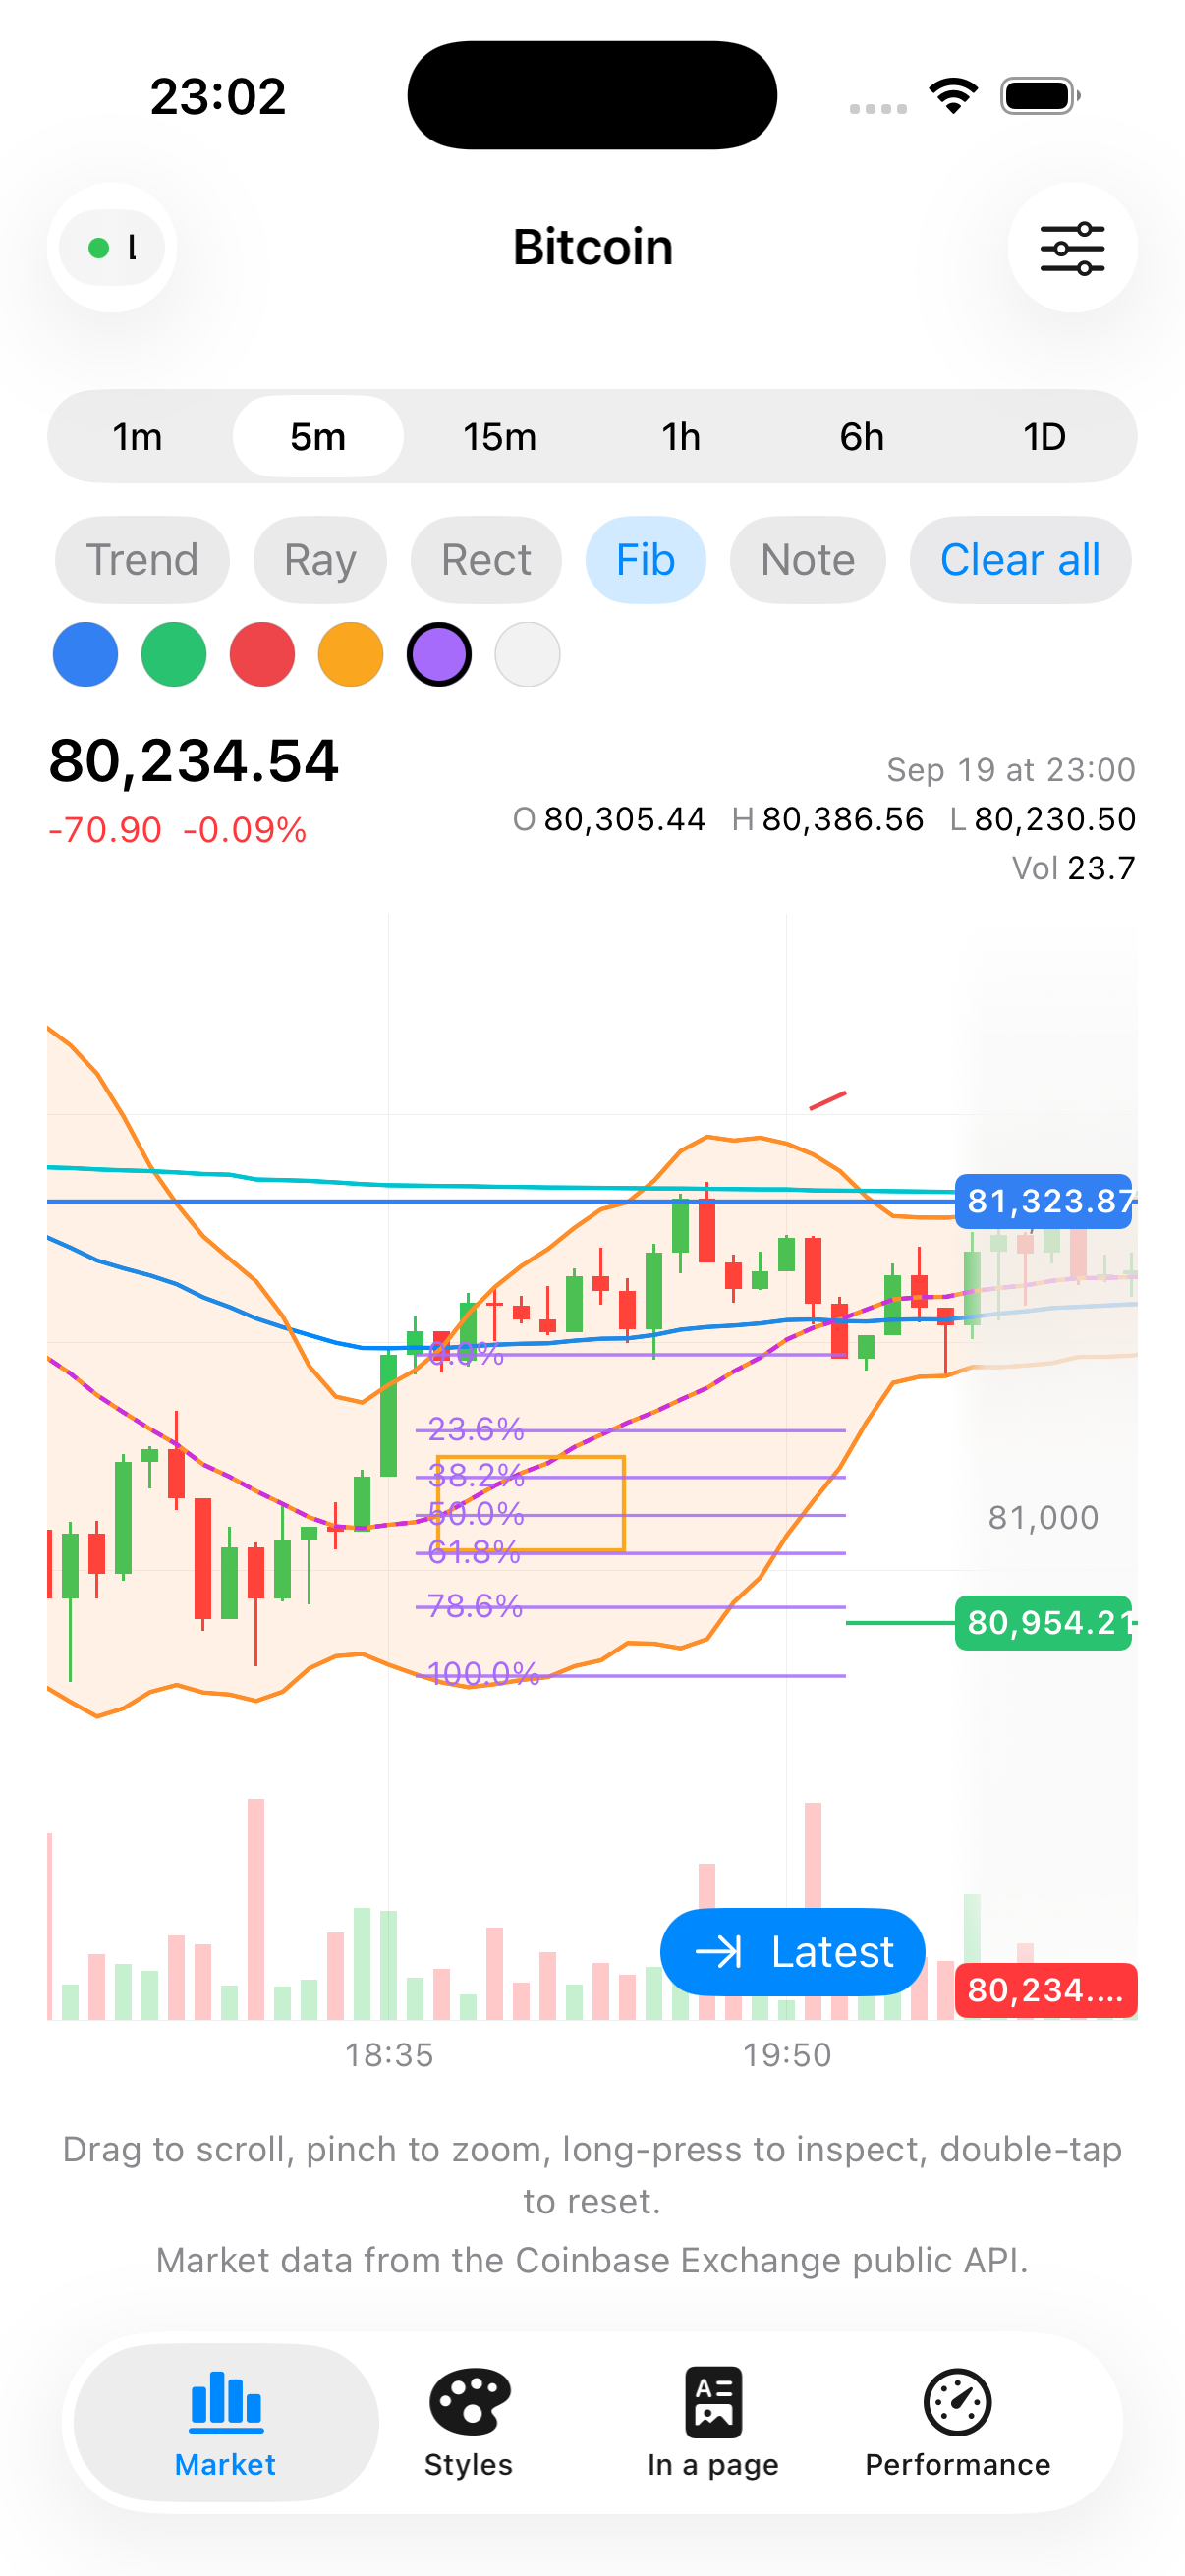
Drawing tools let a person annotate the chart themselves — trend lines, horizontal levels,
Fibonacci retracements, rectangles, and text notes, the same toolkit found in any serious trading
app. CandleKit handles the gesture recognition, the on-screen rendering, snapping, selection and
move/delete interactions; your app owns the data — drawings live in a plain [Drawing] array
you keep in @State, exactly the same "app owns the array" pattern .indicators([...]) already
uses.
Drawing tools cost nothing if you don't use them: omit .drawings(...) entirely, and there's no
extra Canvas layer and no gesture-mode branching in the pan/pinch/long-press recognizers.
Wiring it up
Three bindings, plus one style modifier, are all you need:
CandlestickChart(candles)
    .drawings($drawings)                          // the drawings themselves
    .drawingTool($activeDrawingTool)               // which tool a one-finger drag creates
    .selectedDrawing($selectedDrawingID)            // which drawing is currently selected
    .defaultDrawingStyle(DrawingStyle(color: drawingColor))  // what a NEW drawing looks like
| Modifier | Direction | Purpose |
|---|---|---|
.drawings(_:) | two-way | The array of Drawing values. CandleKit renders them and appends/moves entries as the person draws; you own persistence, undo, and deletion. |
.drawingTool(_:) | two-way | Which DrawingTool a one-finger drag currently creates, or nil for ordinary pan/zoom/crosshair behavior. |
.selectedDrawing(_:) | one-way (chart → app) | Mirrors which drawing's id is selected in cursor mode, so you can show a "Delete" button or inspector. |
.defaultDrawingStyle(_:) | — | The color, line width, dash and fill opacity a newly created drawing starts with. |
While a tool is active, a one-finger drag creates a drawing of that kind instead of panning the
chart, and pinch/long-press are suppressed for the duration — there's nothing useful to zoom or
crosshair mid-draw. Releasing commits the drawing and the tool stays selected, ready for the next
one; tapping the already-active tool again is the "I'm done" exit back to cursor mode. .drawings(...)
must be attached for .drawingTool(...) to do anything — there'd be nowhere to put a drawing
otherwise.
Here's a realistic setup, based on how CandleKit's own demo app wires this together:
struct MarketView: View {
    @State private var candles: [Candle] = []
    @State private var drawings: [Drawing] = []
    @State private var activeDrawingTool: DrawingTool? = nil
    @State private var selectedDrawingID: UUID? = nil
    @State private var drawingColor: DrawingColor = .default

    var body: some View {
        VStack {
            DrawingToolPicker(
                activeTool: $activeDrawingTool,
                drawings: $drawings,
                selectedDrawingID: $selectedDrawingID,
                drawingColor: $drawingColor
            )

            CandlestickChart(candles)
                .drawings($drawings)
                .drawingTool($activeDrawingTool)
                .selectedDrawing($selectedDrawingID)
                .defaultDrawingStyle(DrawingStyle(color: drawingColor))
        }
    }
}

/// A simple tool-picker row: a "Cursor" button, one button per tool, and — once something is
/// selected — Delete and Clear all buttons.
struct DrawingToolPicker: View {
    @Binding var activeTool: DrawingTool?
    @Binding var drawings: [Drawing]
    @Binding var selectedDrawingID: UUID?
    @Binding var drawingColor: DrawingColor

    private static let tools: [(tool: DrawingTool, label: String)] = [
        (.horizontalLine, "H-Line"), (.horizontalRay, "H-Ray"), (.verticalLine, "V-Line"),
        (.trendLine, "Trend"), (.ray, "Ray"), (.rectangle, "Rect"),
        (.fibonacciRetracement, "Fib"), (.textNote, "Note"),
    ]

    var body: some View {
        HStack {
            Button("Cursor") { activeTool = nil }
                .tint(activeTool == nil ? .accentColor : .secondary)

            ForEach(Self.tools, id: \.tool) { entry in
                Button(entry.label) {
                    // Tapping the active tool again exits back to cursor mode.
                    activeTool = (activeTool == entry.tool) ? nil : entry.tool
                }
                .tint(activeTool == entry.tool ? .accentColor : .secondary)
            }

            if selectedDrawingID != nil {
                Button("Delete", role: .destructive) {
                    drawings.removeAll { $0.id == selectedDrawingID }
                    selectedDrawingID = nil
                }
            }
        }
    }
}
Deletion, clearing, and recoloring are all just plain mutations of your own drawings array —
CandleKit doesn't need a dedicated API for any of them, since it's already reading from the same
binding you're writing to.
Every drawing tool
DrawingTool (what a person picks from a toolbar) and DrawingKind (what a finished drawing is
tagged as) share the same eight cases:
| Case | Anchors | What it is |
|---|---|---|
.horizontalLine | 1 | A horizontal price level spanning the full width of the chart. |
.horizontalRay | 2 | A horizontal price level that only extends in one direction from its anchor. |
.verticalLine | 1 | A vertical line marking a moment in time. |
.trendLine | 2 | A straight line between two (time, price) points. |
.ray | 2 | Like a trend line, but extended infinitely past its second anchor. |
.rectangle | 2 | A filled/stroked rectangle between two opposite corners. |
.fibonacciRetracement | 2 | The classic 0%, 23.6%, 38.2%, 50%, 61.8%, 78.6%, 100% retracement levels between two anchors. |
.textNote | 1 | A short text label anchored to one point. |
Every DrawingTool case maps 1:1 to a DrawingKind of the same name — DrawingController is what
turns "this tool is active" into an actual new Drawing as the person drags their finger.
Two flagship trader-UX touches
CandleKit's drawing tools go a step further than "draw a shape" — while you're placing a drawing, it shows you exactly what you're about to commit to, the same way real trading platforms do.
Live price tag while dragging
Every horizontal line or ray — while it's being dragged into place, and after it's committed — gets its price tagged directly on the price axis, following your finger in real time:
Mid-drag |
After release |
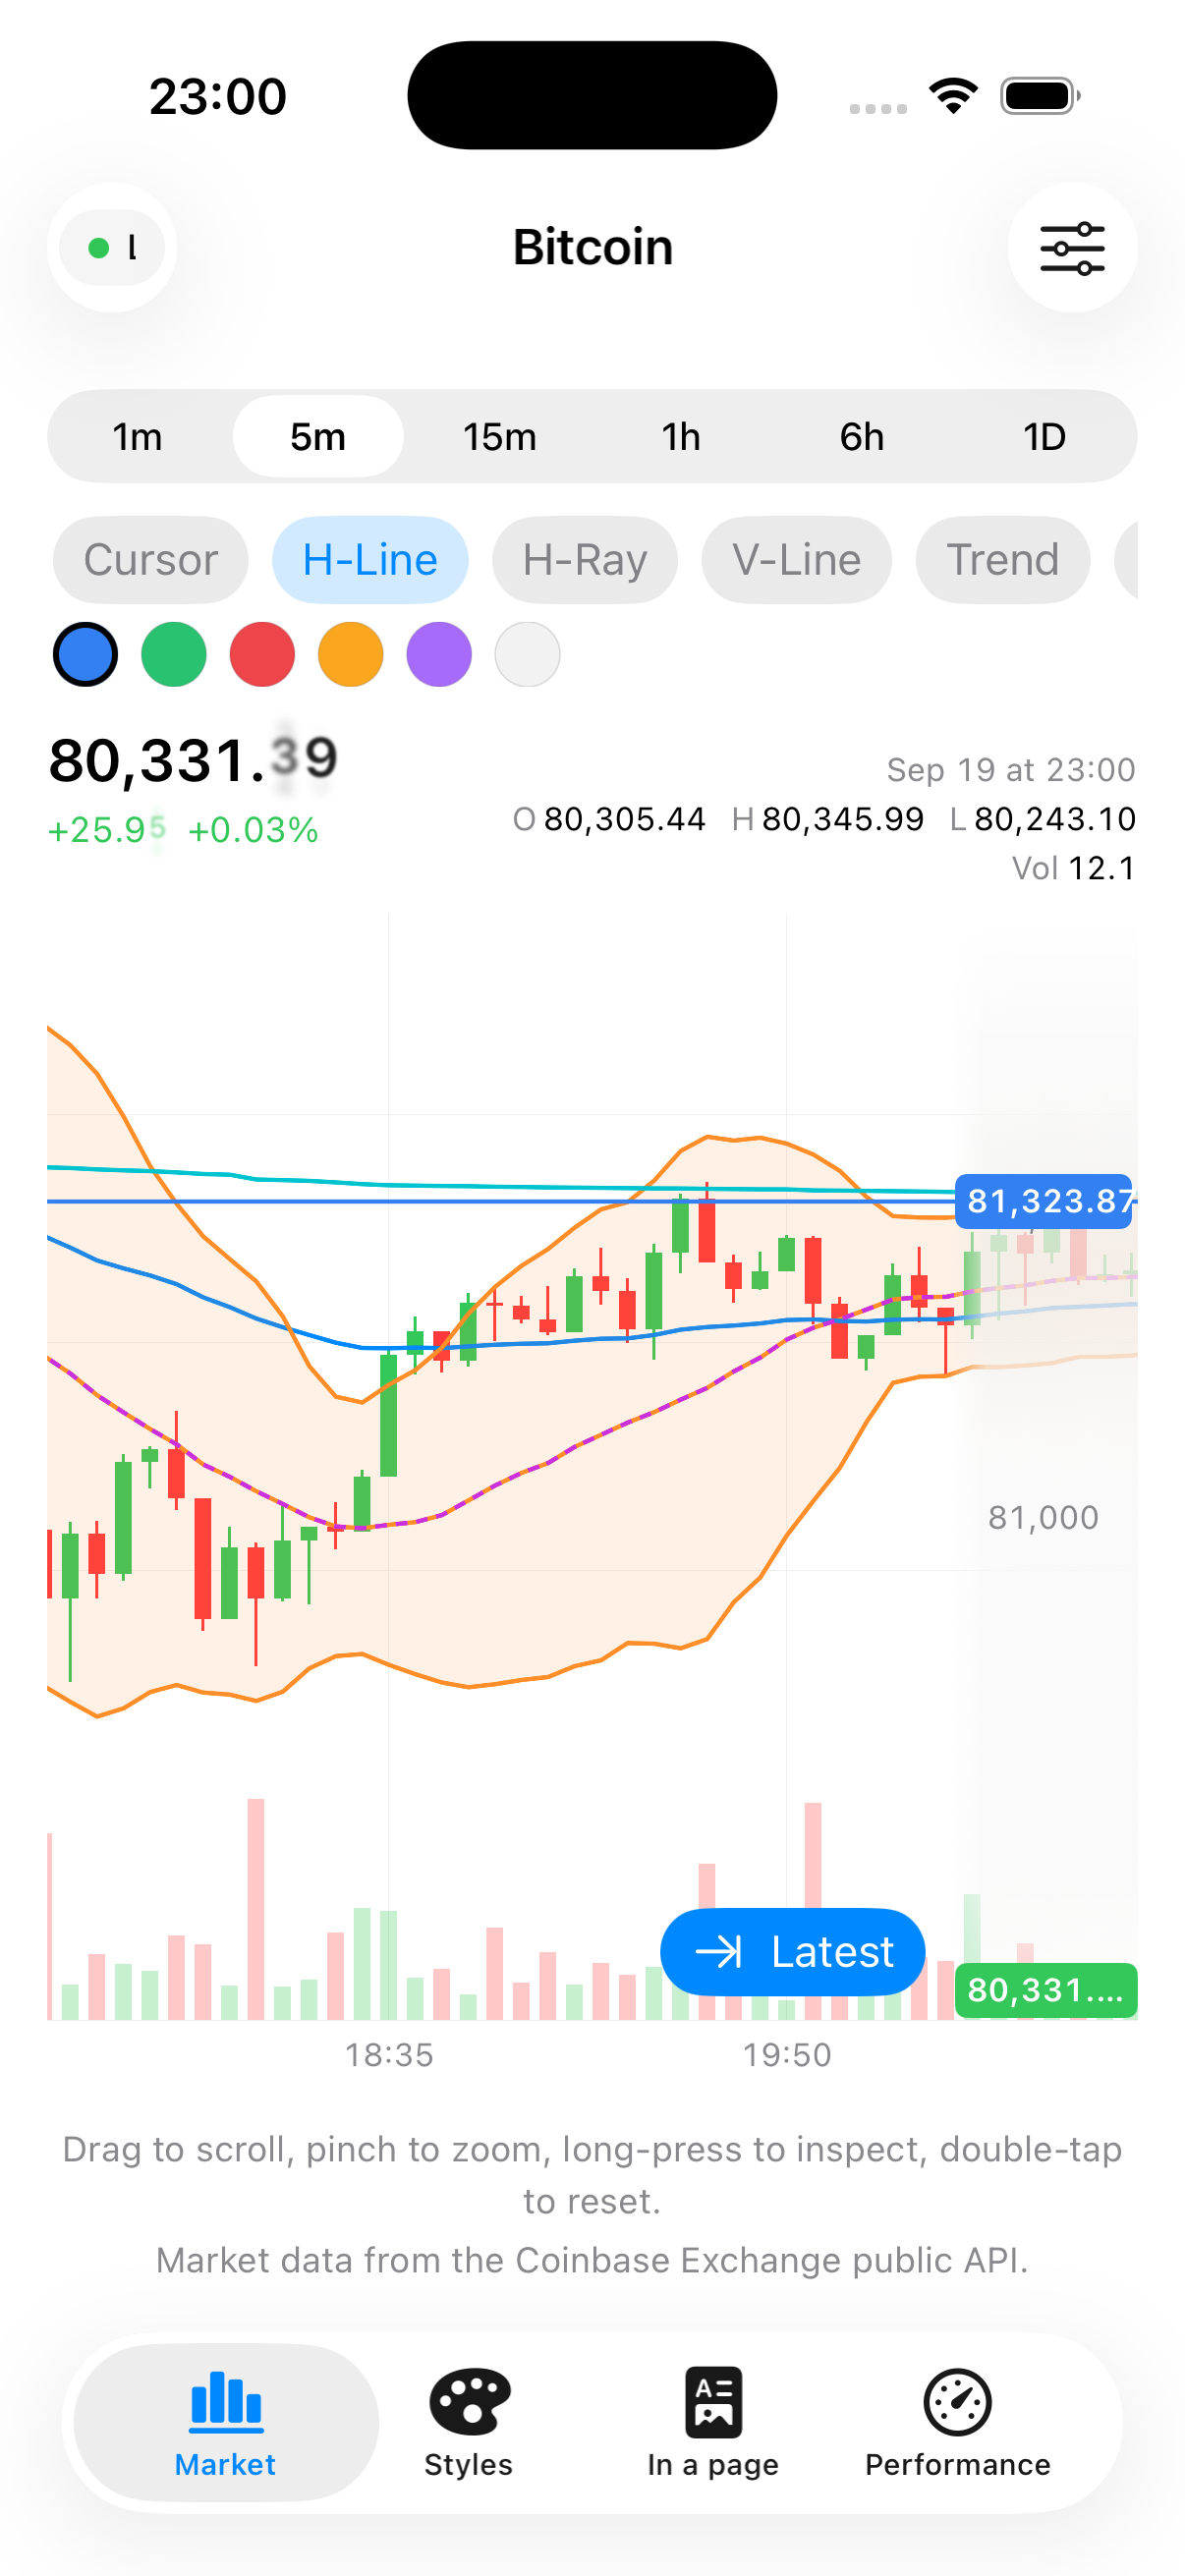
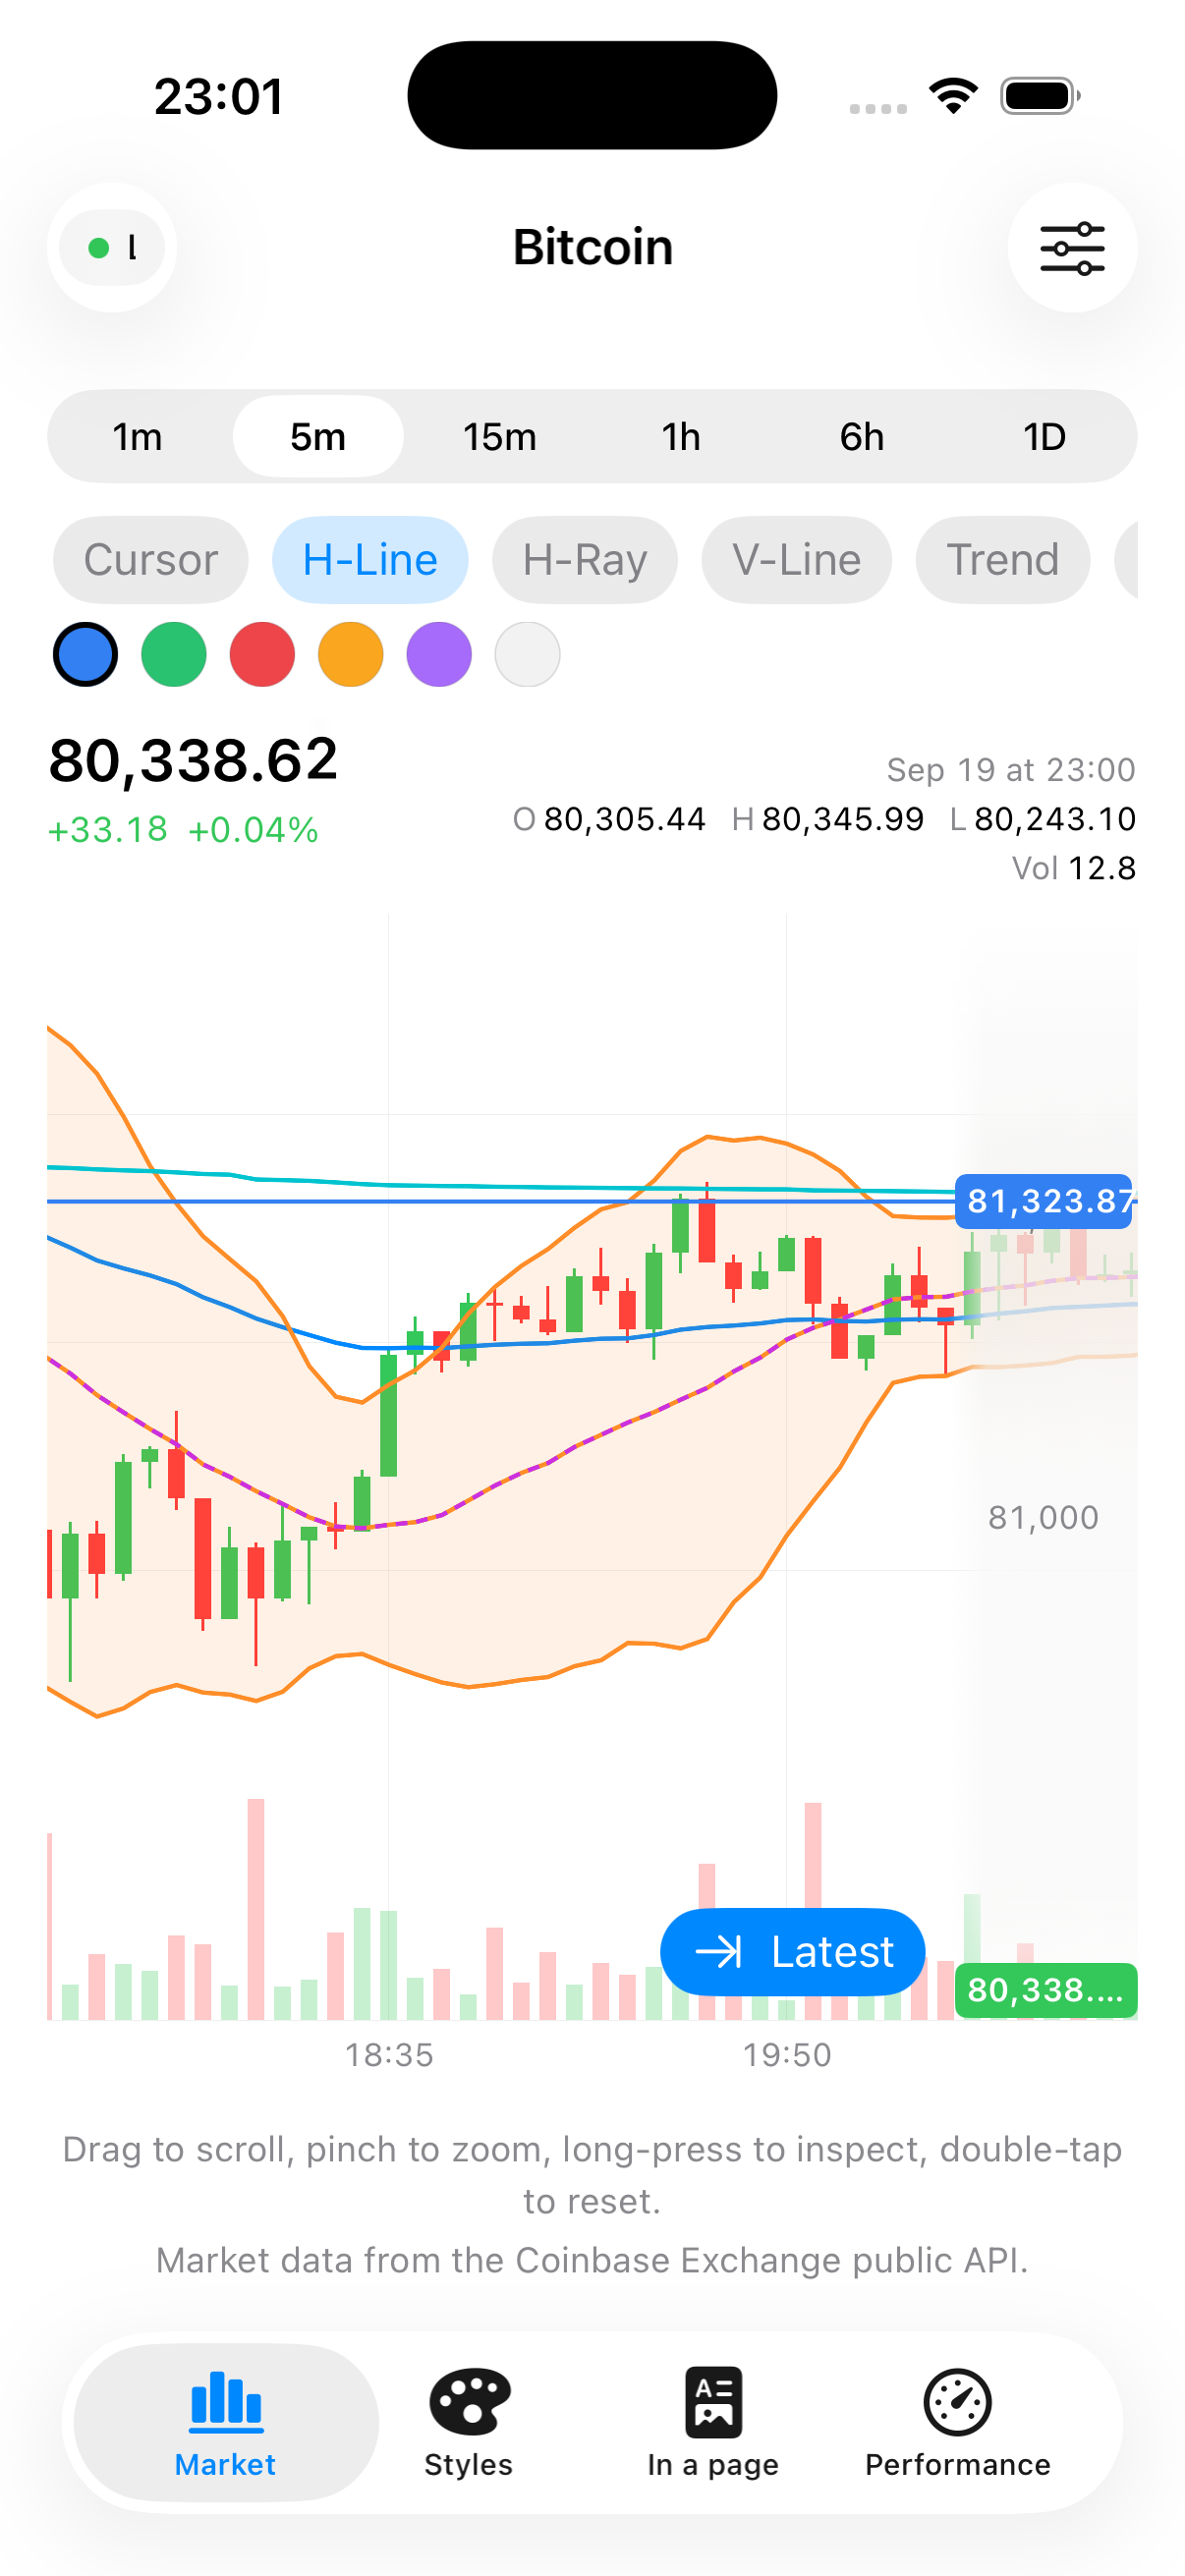
That's the whole point of drawing a horizontal level in the first place — knowing the exact number, not just eyeballing where a line sits.
Live measurement badge while dragging a trend line
Dragging a two-anchor tool (a trend line, a ray, a rectangle, a Fibonacci retracement) shows a floating badge near your finger with the signed price delta and percent change from the first anchor — colored green for a positive move, red for a negative one:
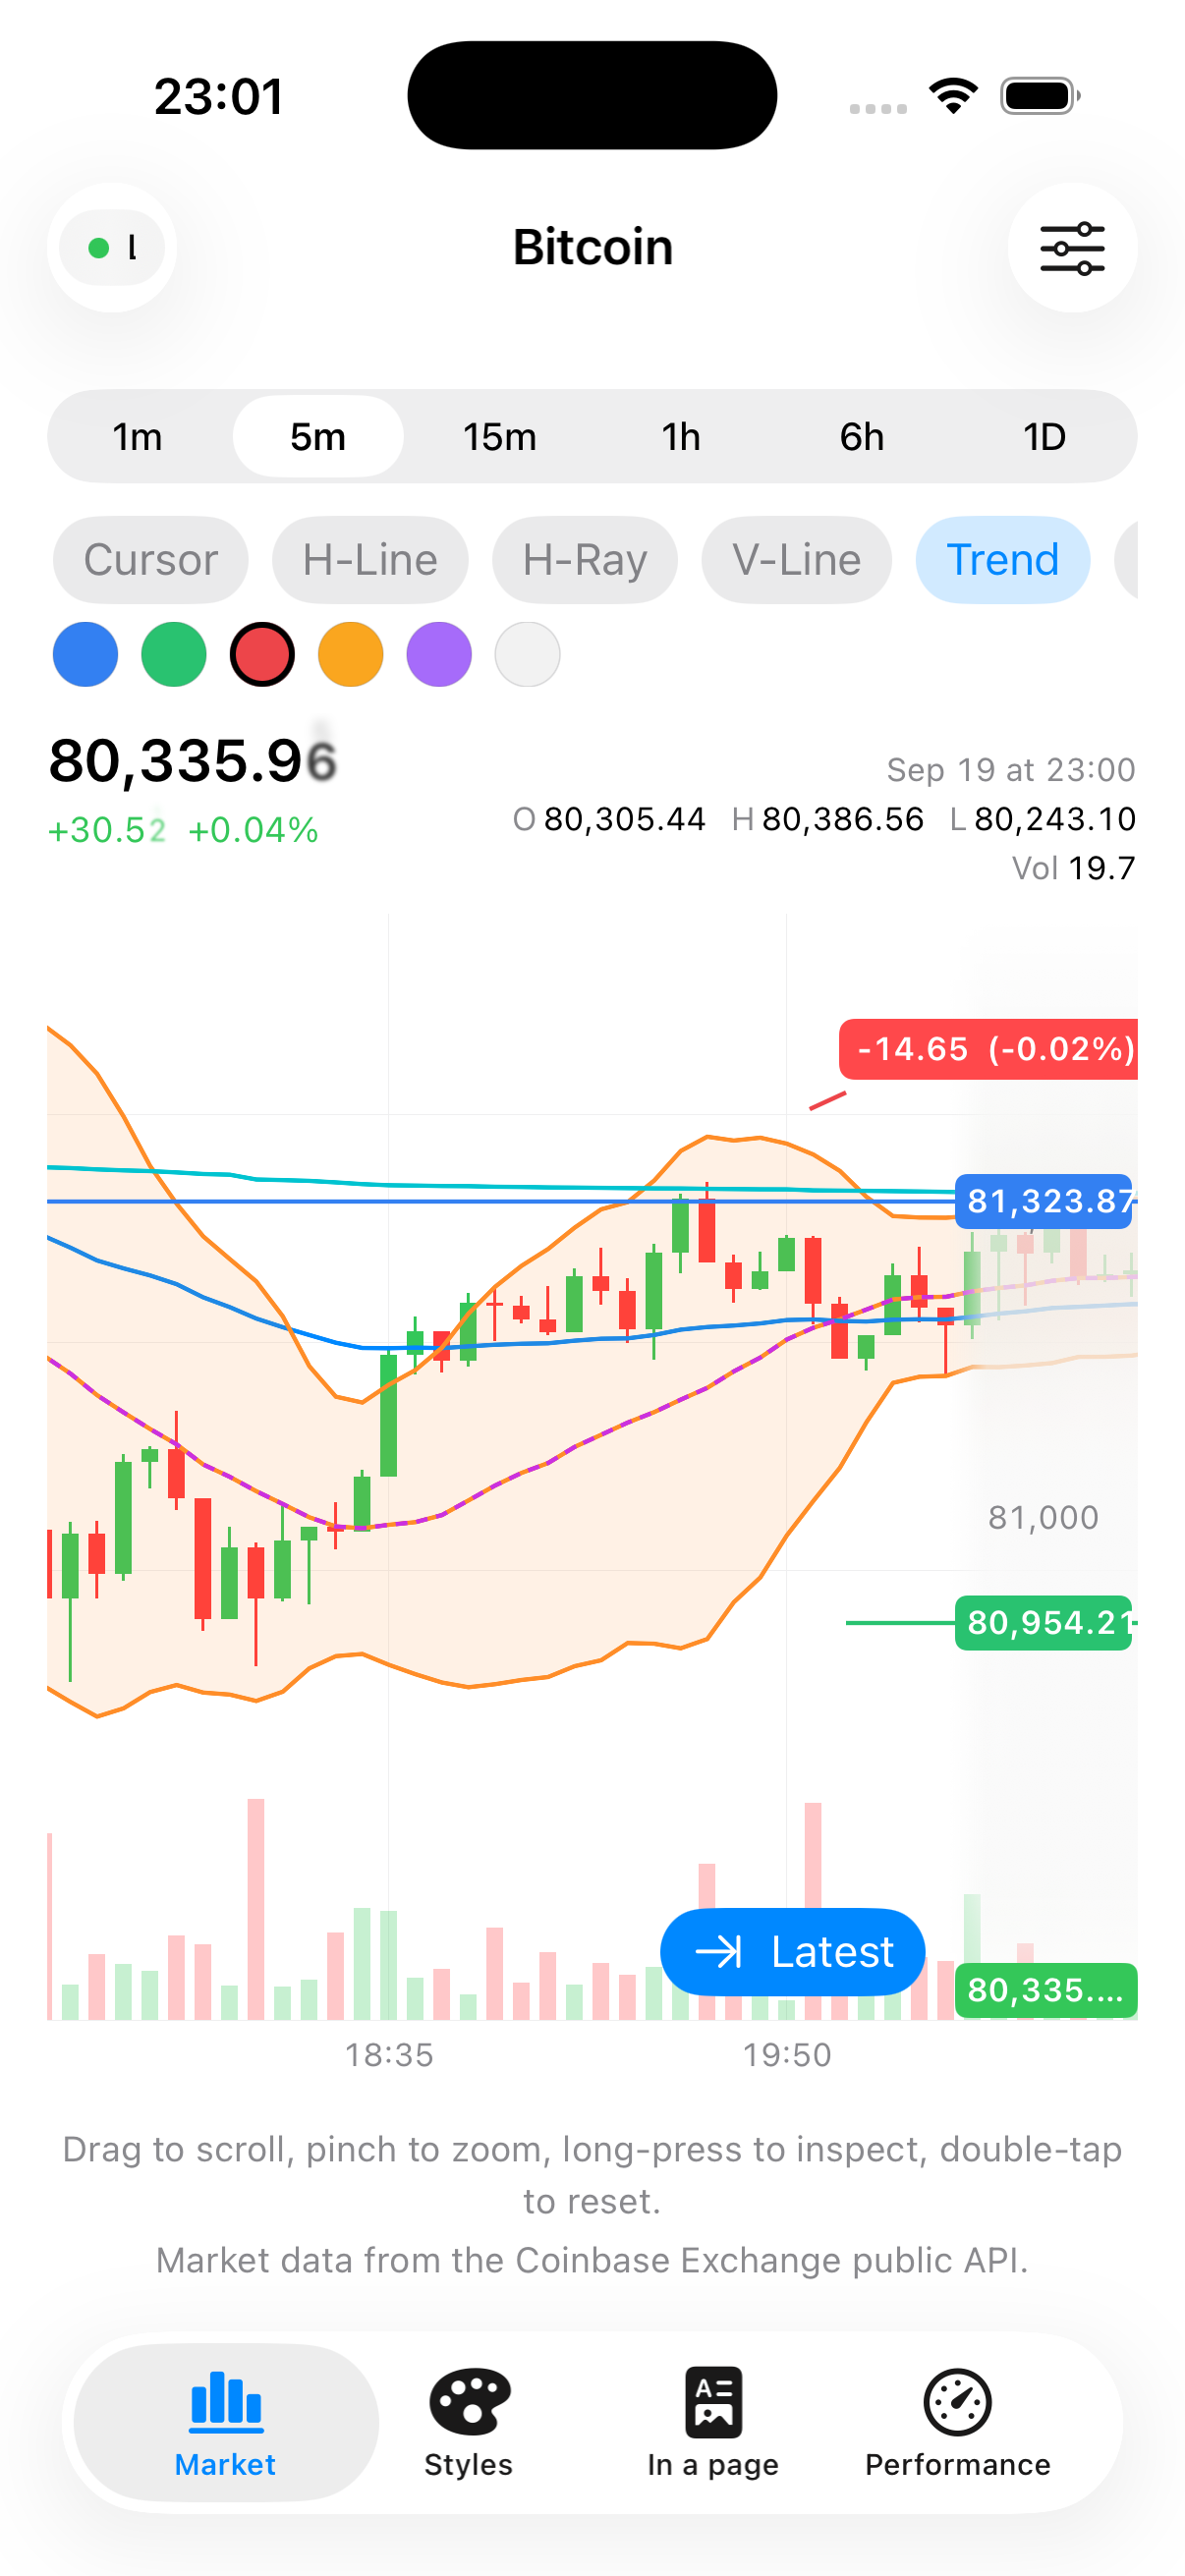
The badge disappears the moment you release — it's a measurement aid for placing the drawing, not permanent clutter on every trend line on your chart.
Snapping
By default, a placed or dragged anchor snaps to the nearest visible candle's open, high, low or
close within a search radius, so a horizontal line reliably lands exactly on a candle's high
instead of one pixel off. This is controlled on DrawingController, which you don't create
directly — CandleKit creates and owns one per chart — but you can reach it if you need to tune it.
For most apps the defaults (snappingEnabled = true, snapRadius = 14 points) are exactly what you
want and need no configuration at all.
Selection, moving and deleting
Tap an existing drawing in cursor mode (no tool active) to select it — .selectedDrawing(_:)
mirrors its id back to you. A selected, unlocked drawing can then be dragged as a whole (the
entire shape translates by the same time/price delta your finger moves); handles are drawn at each
of its anchors while selected.
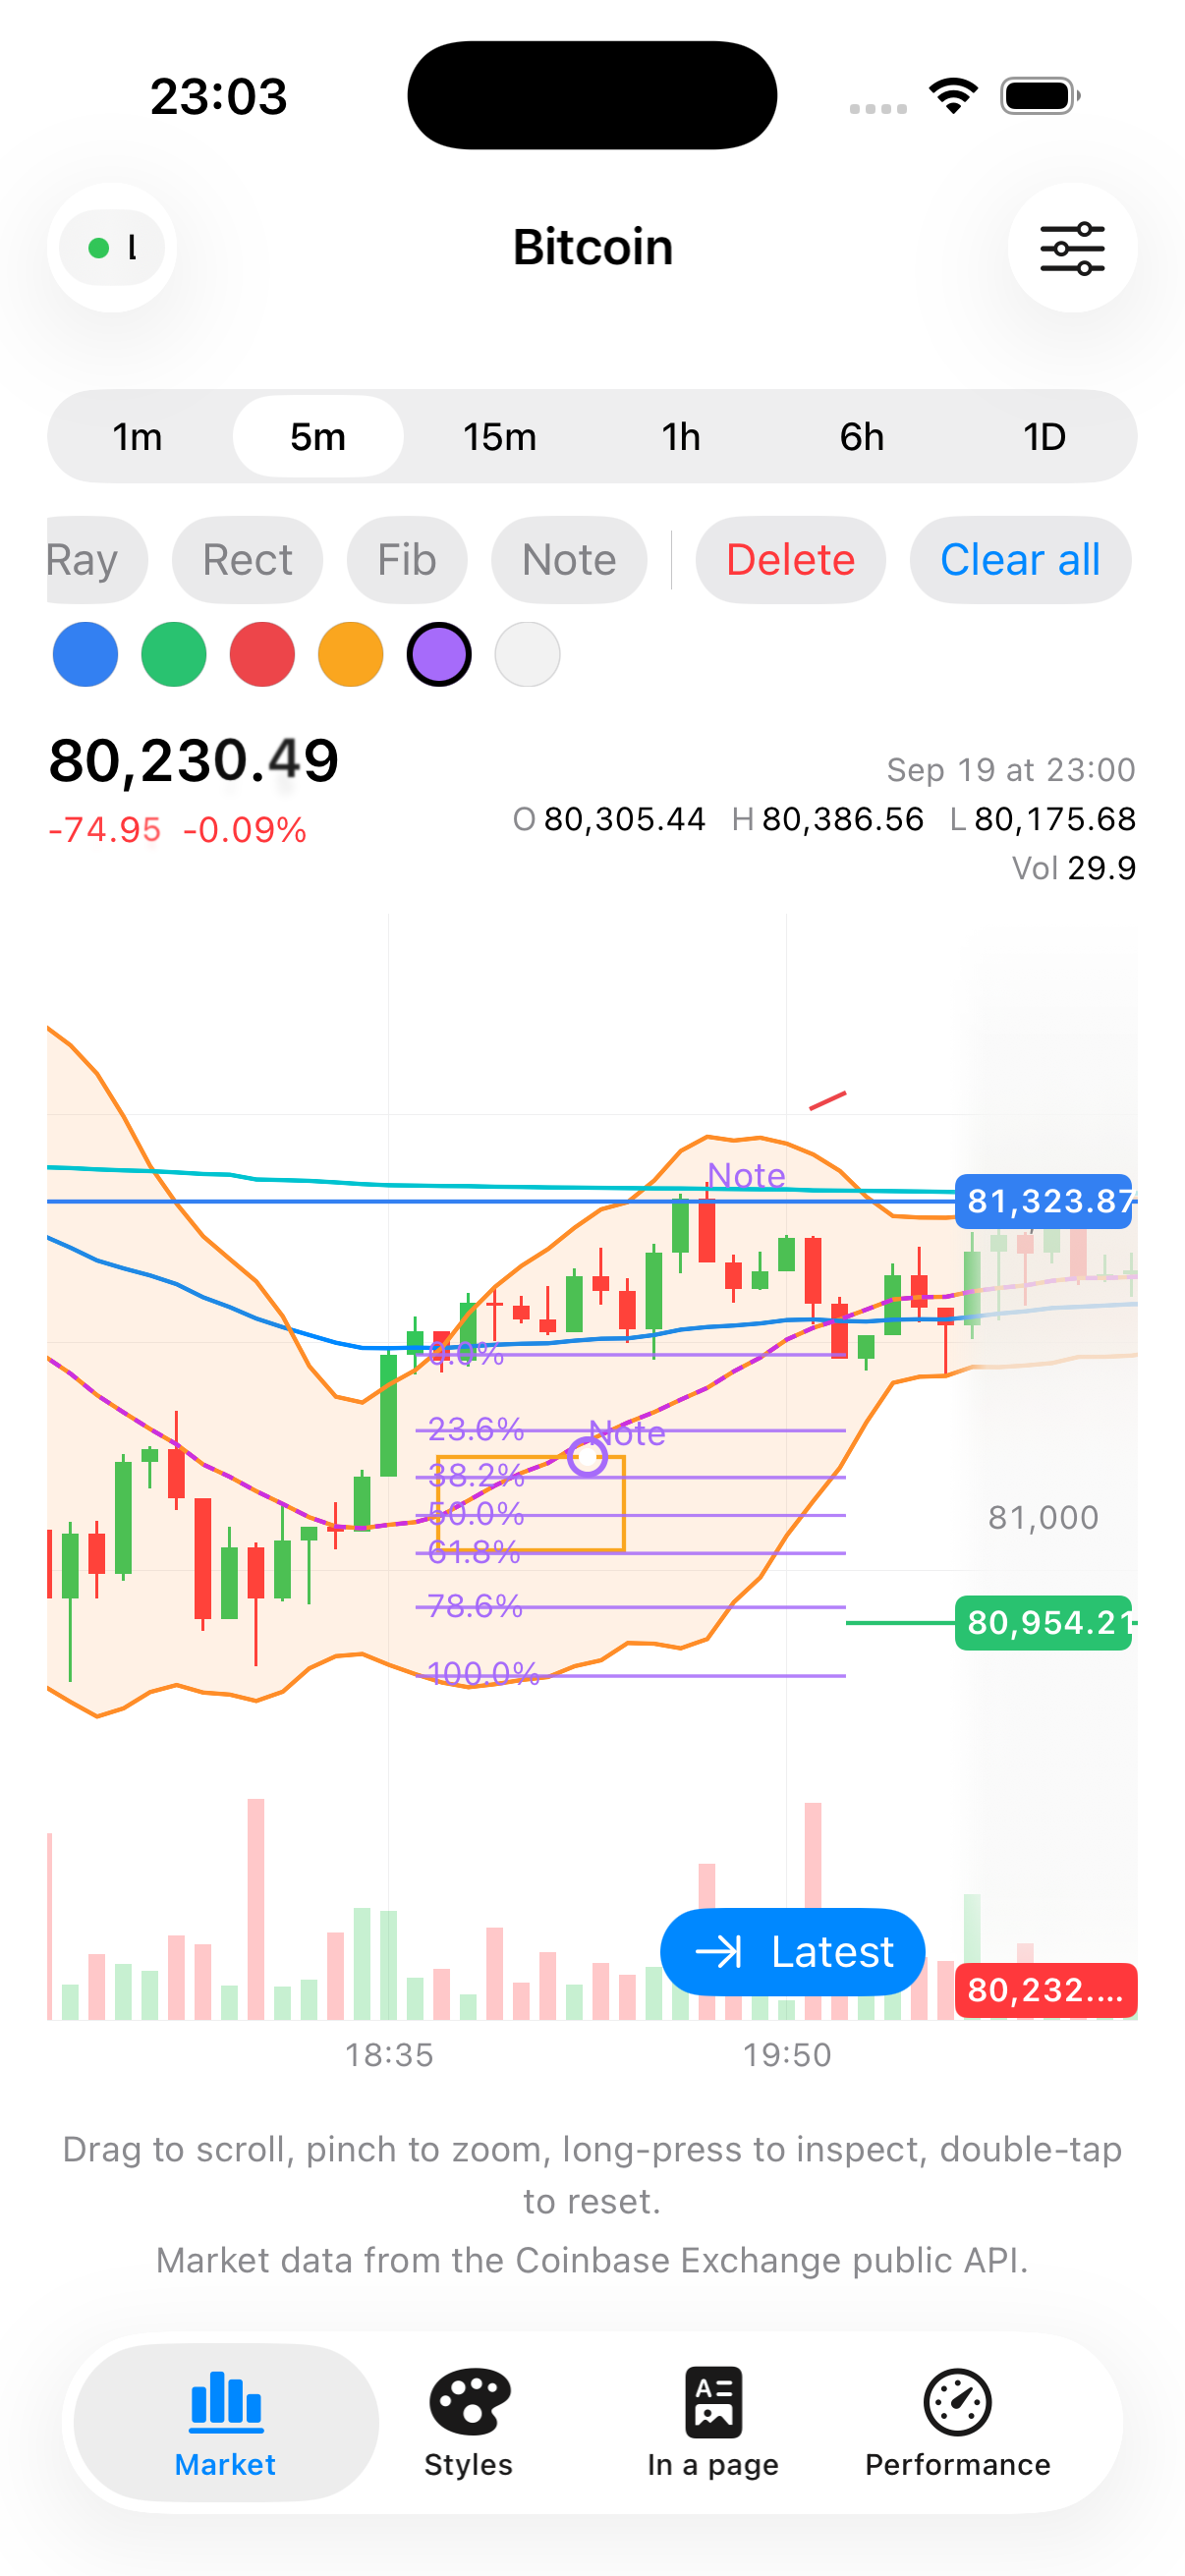
Deleting is just removing it from your own array:
drawings.removeAll { $0.id == selectedDrawingID }
selectedDrawingID = nil
Setting Drawing.isLocked = true on an individual drawing prevents it from being moved, resized or
deleted through the chart's own gestures, without affecting programmatic edits you make yourself.
Drawing.isHidden = true hides it from rendering and hit-testing entirely, without losing its data
— the same toggle-without-losing-configuration pattern ChartIndicator.isVisible uses.
Style and recoloring
Every drawing carries its own DrawingStyle — color, line width, an optional dash pattern, and an
optional fill opacity for shapes that enclose an area (a rectangle):
public struct DrawingStyle: Codable, Hashable, Sendable {
    public var color: DrawingColor
    public var lineWidth: Double
    public var dash: [Double]?
    public var fillOpacity: Double?
}
DrawingColor is a plain RGBA struct (not SwiftUI.Color) so it stays Codable and portable —
convert it to a real color with Color(_ drawingColor:), which CandleKit provides as an
initializer extension.
.defaultDrawingStyle(_:) only controls what the next new drawing starts as. To recolor a
drawing that already exists — including the currently selected one — just mutate its style
directly in your own .drawings(...) array:
if let index = drawings.firstIndex(where: { $0.id == selectedDrawingID }) {
    drawings[index].style.color = DrawingColor(red: 0.16, green: 0.76, blue: 0.44) // green
}
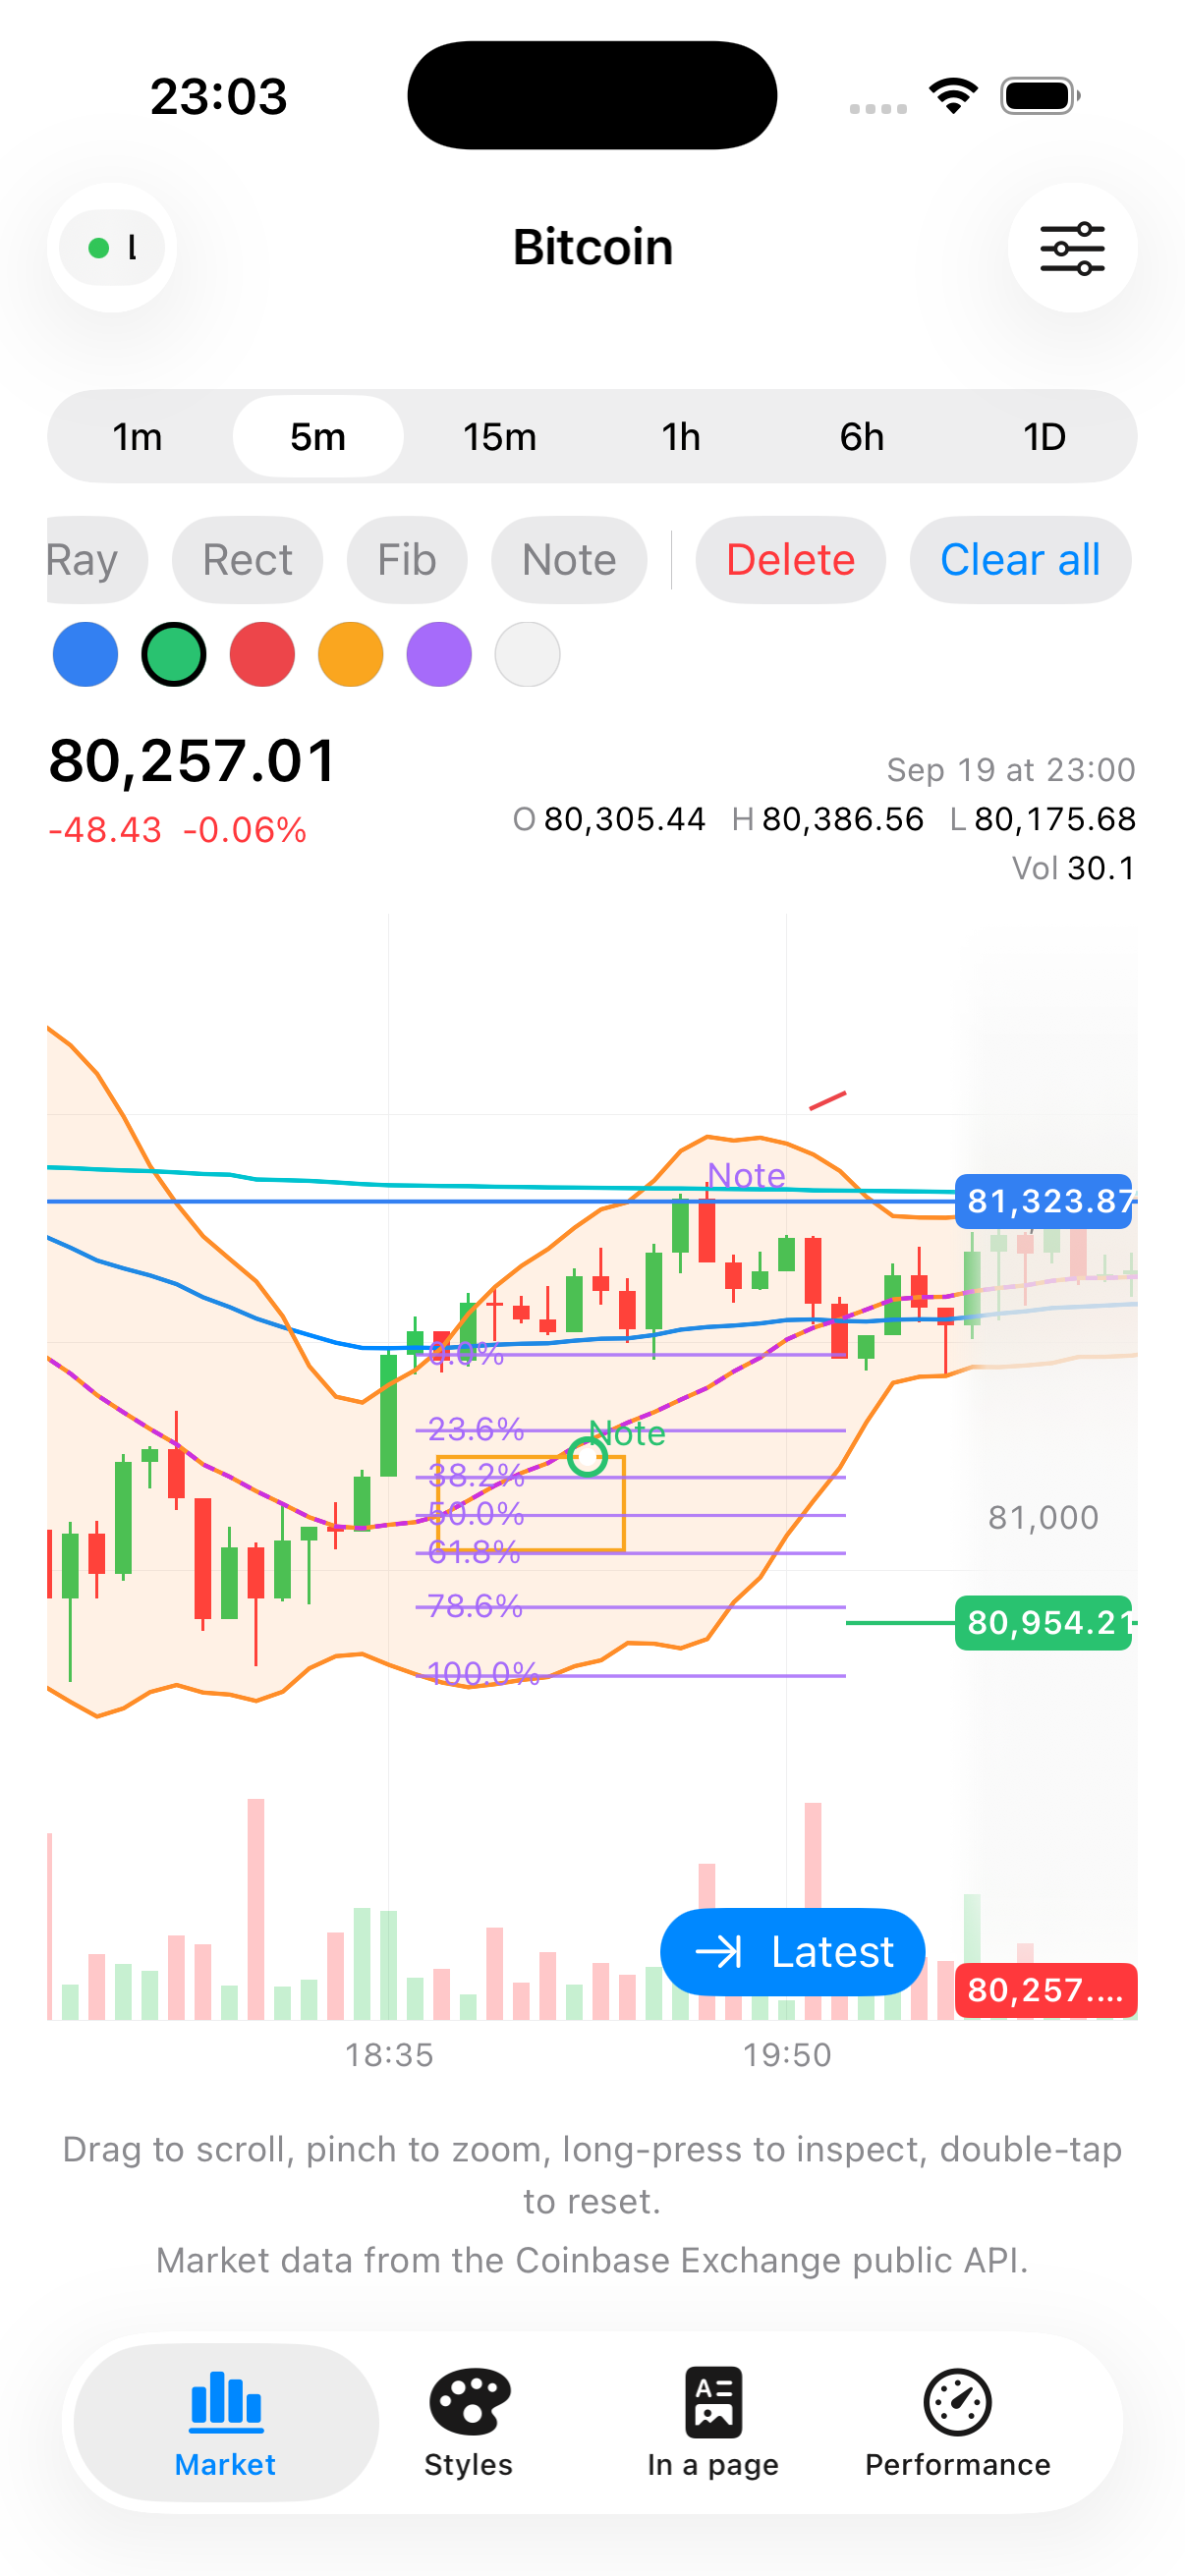
Because a color swatch row can both set the default color for what's drawn next and recolor whatever's currently selected with the same tap, one small UI does double duty — exactly what you see in the screenshot above.
See the Drawing API reference for the complete, precise API — every property,
case and method on Drawing, DrawingKind, DrawingAnchor, DrawingStyle, DrawingColor,
DrawingTool and DrawingController.